HTML5 Web Components
Michel Buffa
April 2014
buffa@unice.fr


<multitrack src="Bass">

<tr>
    <td class="trackBox" style="height : 75px">
        <progress class="pisteProgress" id="progress0" value="3"
                  max="3" style="width : 75px">
        </progress>
        Bass
        <div style="float : right;">
            <button class="mute" id="mute0" onclick="muteUnmuteTrack(0);"
                    disabled="disabled">
                <span class="glyphicon glyphicon-volume-up"></span>
            </button>
            <button class="solo" id="solo0" onclick="soloNosoloTrack(0);"
                    disabled="disabled">
                <img src="../img/earphones.png">
            </button>
        </div>
        <span id="volspan">
            <input type="range" class="volumeSlider" id="volume0" min="0"
                   max="100" value="100"
                   onchange="setVolumeOfTrackDependingOnSliderValue(0);">
        </span>
    </td>
</tr>
How do you think they made this <video> element?
They are parts of HTML code (including scripts and styles) that can be reused (similar to mustache for example)
These parts of code are inert (CSS will not be applied, JS not executed, images not loaded, videos not played, etc) until the template is used.
 <template id="mytemplate">
    <img src="" alt="great image">
    <div class="comment"></div>
</template>
It's ok to have src empty here... we'll set it later...
var t = document.querySelector('#mytemplate');
// Populate the src at runtime.
t.content.querySelector('img').src = 'http://webcomponents.github.io/img/logo.svg';

var clone = document.importNode(t.content, true);
document.body.appendChild(clone);
Current support: all browsers (including mobile ones) except IE/Safari
Currently: no support for {{...}} JavaScript variable substitution like in popular template engines, but... it's coming!
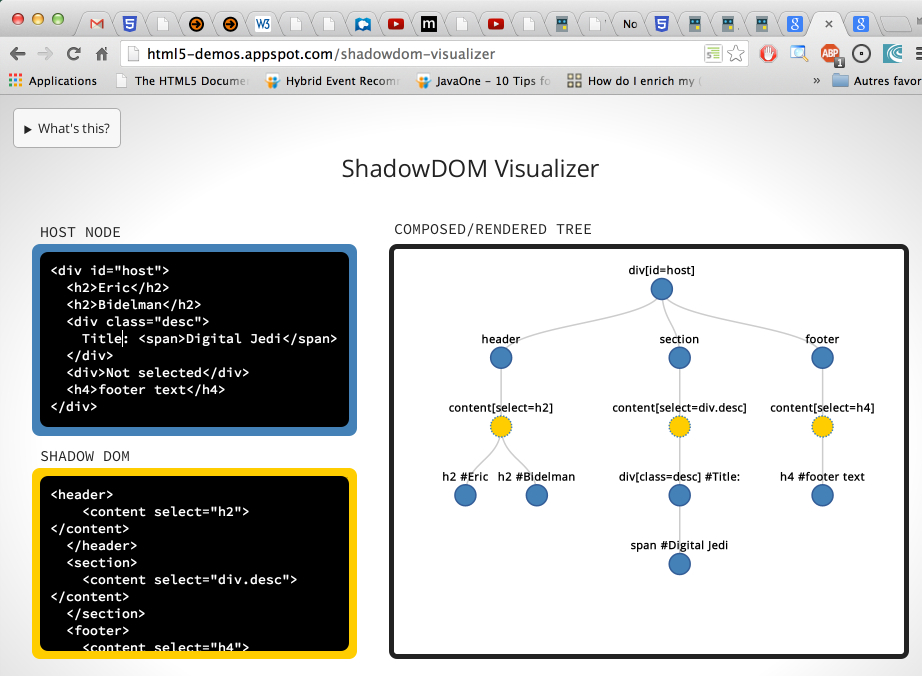
Provides DOM encapsulation: hide what is not necessary!
This is already used by browsers' developers for <audio> or <video> elements etc.
The three rules of Shadow DOM:
<button>Hello, world (not rendered)!</button>
<script>
    var host = document.querySelector('button');
    var root = host.createShadowRoot();
    root.textContent = 'the shadow root node is rendered';
</script>
Demonstration!
Let's mix templates and shadow DOM! Demonstration!
<template id="mytemplate">
  <style>
    h1 {color:white; background:red}
    </style>
  <h1>This is a shadowed H1</h1>
</template>
// Instanciate the template
var t = document.querySelector('#mytemplate');
var clone = document.importNode(t.content, true);

// Create a root node under our H1 title
var host = document.querySelector('h1');
var root =  host.createShadowRoot();

// Put template content in the root node
root.appendChild(document.importNode(t.content, true));
root.applyAuthorStyles = true; // false by defaultCSS reset your internal styles: (Demonstration!)
root.resetStyleInheritance = true; // false by default
<template id="mytemplate">
    <h1 part="heading">This is a shadowed H1</h1>
    <p part="paragraph">Paragraph part</p>
</template>

<body>
    <div id="myWidget"></div>
</body>
#myWidget::part(heading) {
  color:red;
}
 <template id="mytemplate">
  <h1 part='heading'>This is a shadowed H1</h1>
  <p part="paragraph">
    <content></content>
  </p>
</template>

<body>
  <H1 class="myWidget">Injected content</h1>
</body>
this attribute's value is a CSS selector: Demonstration!
 <template id="mytemplate">
    <h1 part='heading'><content select="#titleToInject"></content></h1>
    <p part="paragraph">
    <content select="#partToInject"></content>
</p>
</template>

<body>
    <div class="myWidget">
        <span id="titleToInject">Title injected</span>
        <span id="partToInject">Paragraph injected</span>
    </div>
</body>
They are elements that extends the browser (the browser will render them in addition to HTML5 ones).
Basic usage:
  document.registerElement('tag-name', {
    prototype: proto
})
The element's new name should have a dash!
The prototype must inherit from HTMLElement.
 // Instanciate the template
var t = document.querySelector('#mytemplate');
var clone = document.importNode(t.content, true);

var widgetProto = Object.create(HTMLElement.prototype);

widgetProto.createdCallback = function() {
  car root = this.createShadowRoot();
  root.appendChild(clone);
}

var Widget = document.registerElement("my-widget", {
  prototype : widgetProto
})
The new element can be used as any HTML5 element: Demonstration!
<body>
  <my-widget>
     <span id="titleToInject">Title injected</span>
    <span id="partToInject">Paragraph injected</span>
  </my-widget>
</body>
Similar to including CSS in your page!
Package your components in a HTML page (that can use CSS, JS, etc) and import it!
It cannot be simpler than:
<head>
<link rel="imports" href="components/myComponents.html">
</head>
<body>
  <my-widget>
     <span id="titleToInject">Title injected</span>
    <span id="partToInject">Paragraph injected</span>
  </my-widget>
</body>